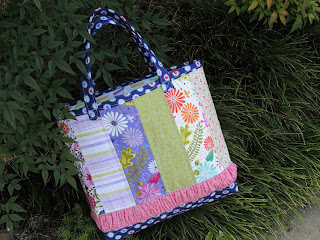
I was inspired by all the cute totes I saw online and decided to make a tote bag to use on vacation. I had some fat quarters that were calling out to be made into something and I needed a bag more than another lap quilt. So here is the finished bag. I borrowed ideas from several blogs I have visited lately. Can't remember all of them. Hopefully, if I copied your idea, you will consider that imitation is the sincerest form of flattery. I have tried to show the steps to make the bag if you are interested.
First, choose some fat quarters that kind of go together. Cut a 3 1/2" strip across the width of six and sew together with 1/4" seams. Trim off the selvage ends and the opposite end.
Cut the block of fabric in half.
Cut two WOF strips from an accent fabric and gather top and bottom of each strip. Sew the gathered strips to each panel and add 6 1/2 " X 19" dark fabric for the bottom of the bag. I used the very stiffest interfacing instead of batting so the bag would keep its shape. I cut the interfacing to fit the fabric and then used a zigzag top stitch to attach the fabric to the interfacing. The interfacing was a bit tricky to quilt but I like the finished look of it.
Make the bottom flat by stitching across the corners. I measured 2" and penciled a stitching line on each side.
Make a lining out of two fat quarters. Add pockets if you want.
I didn't want to do the invisible seam thing since the interfacing is so stiff. I stitched the lining to the outside with 1/4" seam.
I used some of the leftover bottom fabric to finish the top and make the handles.
I am very pleased with the finished bag. It took 5" WOF and 9 fat quarters but six of the FQs can be used for another small project. I had the interfacing left from making hats for my grandson. So everything was in my stash.
Happy Friday! Linking with Crazy Mom Quilts. See you there.


No comments:
Post a Comment